Step 1: Clone a PHOENIX stellar model spectrum#
Here we demo the first step of blasé, cloning a precomputed synthetic spectrum with a product-of-Voigt profiles approach.
[1]:
import torch
from blase.emulator import SparseLinearEmulator
from gollum.phoenix import PHOENIXSpectrum
%matplotlib inline
%config InlineBackend.figure_format='retina'
blasé is much faster if you happen to have an NVIDIA® GPU. Most consumer laptops don’t have this hardware, but cpu codes will still work (just slower)!
[2]:
if torch.cuda.is_available():
    device = "cuda"
else:
    device = "cpu"
Set the wavelength limits#
We will target a relatively narrow chunk of spectrum: \(11000 - 11180\) Å. We use a \(60\) Å buffer to deal with edge effects.
[3]:
wl_lo = 11_000-60
wl_hi = 11_180+60
Read in a precomputed synthetic stellar spectrum#
The gollum precomputed synthetic spectral model interface makes this step pretty straightforward. You don’t even need to have the file locally– gollum can fetch it for you.
[4]:
stellar_spectrum = PHOENIXSpectrum(teff=4700, logg=4.5,
                                   wl_lo=wl_lo, wl_hi=wl_hi, download=True)
The pristine PHOENIX spectrum needs to be flattened to facilitate line finding: We first divide out the black body and then divide by a \(5^{th}\) order polynomial.
[5]:
stellar_spectrum = stellar_spectrum.divide_by_blackbody()
stellar_spectrum = stellar_spectrum.normalize()
continuum_fit = stellar_spectrum.fit_continuum(polyorder=5)
stellar_spectrum = stellar_spectrum.divide(continuum_fit, handle_meta="ff")
Clone the stellar model#
We make an emulator for the spectrum by cloning all of the spectral lines above some prominence threshold:
[6]:
%%capture
stellar_emulator = SparseLinearEmulator(stellar_spectrum.wavelength.value,
                             stellar_spectrum.flux.value,
                             wing_cut_pixels=6000, prominence=0.01, device=device)
The emulator found hundreds of spectral lines through a heuristic process, and then instantiates a Voigt profile there.
[7]:
len(stellar_emulator.lam_centers)
[7]:
426
The forward pass of the model makes a spectrum that we can examine:
[8]:
with torch.no_grad():
    stellar_pre = stellar_emulator.forward().cpu().numpy()
The initial guess should look lousy:
[9]:
ax = stellar_spectrum.plot(ylo=0.5, yhi=1.05, label='Native PHOENIX model')
ax.step(stellar_spectrum.wavelength.value, stellar_pre, label='Initial guess')
ax.set_xlim(11_060, 11_120)
ax.legend();
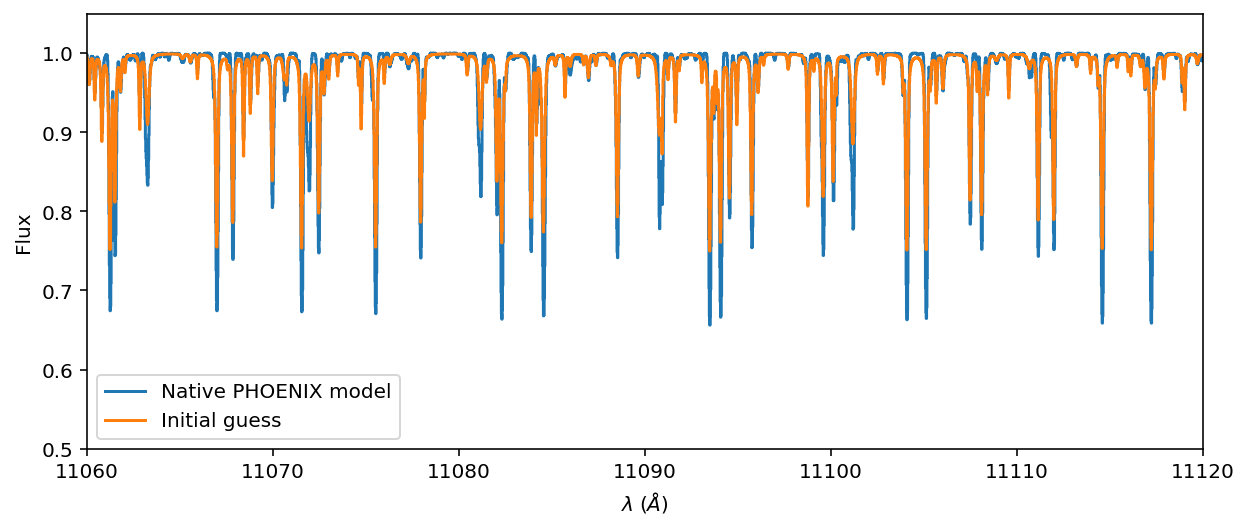
The initialization is terrible! It’s just a coarse guess that there is a line there with an approximate width and depth. In the next step we will fine tune that guess.
Fine-tune the model to clone the spectrum to near pixel-perfect#
Here we adjust all of the properties of the lines simultaneously with the backpropagation algorithm built into PyTorch. Here we choose the bare minimum of 20 epochs with an aggressive learning rate (LR) of 0.05. You should be able to get a better fit by running it for say 300 epochs, with a learning rate (LR) of 0.01, for example. But it would take much longer.
[10]:
stellar_emulator.optimize(epochs=20, LR=0.05)
Training Loss: 0.00022070: 100%|████████████████| 20/20 [00:29<00:00, 1.46s/it]
Now we can examine the spectrum, post fine-tuning. It should provide a much better fit:
[11]:
with torch.no_grad():
    stellar_post = stellar_emulator.forward().cpu().numpy()
[12]:
ax = stellar_spectrum.plot(ylo=0.5, yhi=1.05, label='Native PHOENIX model')
ax.step(stellar_spectrum.wavelength.value, stellar_post, label='Fine-Tuned clone with blasé')
ax.set_xlim(11_060, 11_120)
ax.legend();
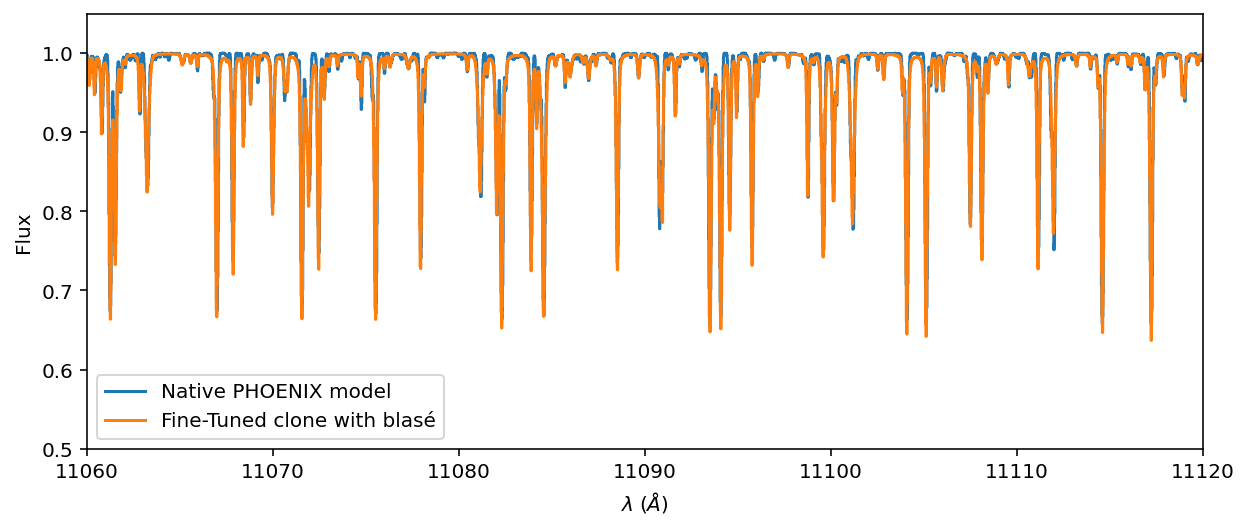
Voilá! It’s not perfect, but it’s much better than before. And recall that this is the clone at native resolution and pixel sampling. Most models will ultimately be convolved with an instrumental kernel that will wash away most of these imperfections.
Saving fine-tuned parameters as a “lookup table”#
The collection of values for the wavelength centers, amplitudes, Gaussian widths, Lorentzian widths, and other parameters represents a reproducible snapshot of the model state:
If you hand me the “lookup table” of these parameters, I can recreate the entire cloned forward model.
[13]:
torch.save(stellar_emulator.state_dict(), "phoenix_clone_T4700g4p5_prom0p01_11000Ang.pt")